Getting Started with OpenAI Codex CLI
Table of Contents
I’ve been playing with the recently announced OpenAI Codex CLI.
What is OpenAI Codex CLI? #
OpenAI Codex CLI is available on GitHub. It’s a lightweight AI coding assistant that runs directly in the terminal, like Claude Code from Anthropic.
Features include:
- Read, modify, and run code
- Multimodal input for processing screenshots and diagrams
- Different approval levels
While it’s still labeled as experimental, OpenAI is actively seeking community contributions. They’re even offering a $1 million initiative supporting open-source projects that use Codex CLI, with grants in $25,000 API credit increments.
Installation #
Getting started is simple. First, install it via npm:
$ npm i -g @openai/codex
npm warn deprecated lodash.isequal@4.5.0: This package is deprecated. Use require('node:util').isDeepStrictEqual instead.

changed 162 packages in 12s
You can also use Yarn or Bun if you prefer:
$ yarn global add @openai/codex
# or
$ bun install -g @openai/codex
After installation, you’ll need an OpenAI API key. If you try to run Codex without one:
$ codex -m o4-mini

Missing OpenAI API key.

Set the environment variable OPENAI_API_KEY and re-run this command.
You can create a key here: https://platform.openai.com/account/api-keys
You’ll need to head over to OpenAI’s platform to create your API key:
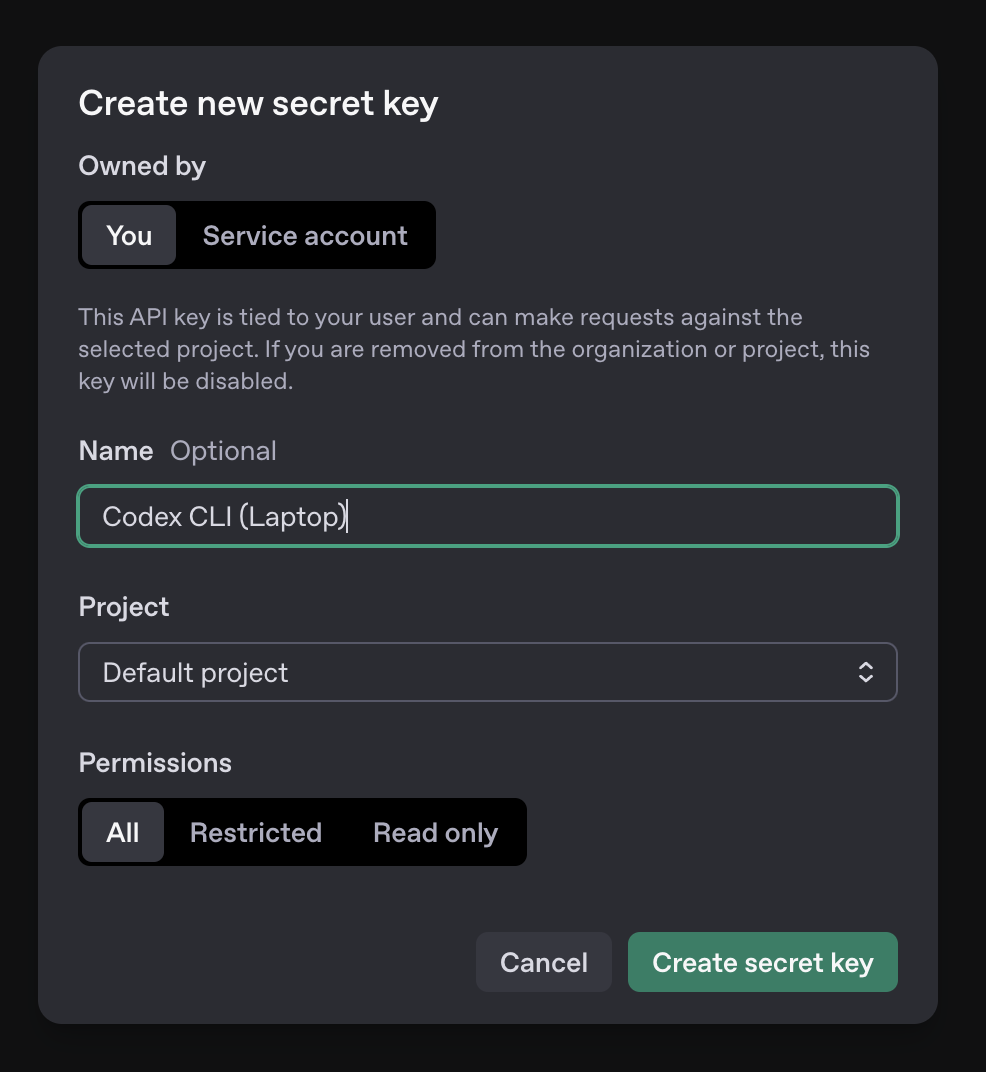
Once you have your key, you have a few options:
Option 1: Export as an environment variable #
$ export OPENAI_API_KEY='...XXX...'
Option 2: Create a .env file #
Codex automatically reads from a .env file in your current directory:
# In a file named .env in your current directory
OPENAI_API_KEY=your-api-key-here
This is particularly handy for project-specific settings.
Option 3: Permanent solutions #
For more persistent use across sessions:
- Adding the export to your
.bashrcor.zshrc(though be careful with dotfiles in public repos) - Using a tool like direnv to set environment variables per directory
- Setting up a credential manager like pass and sourcing it in your shell startup
Using Codex CLI #
With your API key configured, you can now launch Codex:
$ codex
Or with a specific model:
$ codex -m o4-mini
The -m o4-mini flag specifies the model to use. In this case, OpenAI’s smaller o4-mini model which is faster and less resource-intensive, perfect for quick coding tasks.
What I like about Codex is its flexibility. You can use it in different modes:
Interactive Mode #
Just run codex without arguments to start a conversation:
$ codex
This drops you into an interactive session where you can chat with Codex about your code, ask questions, and request changes.
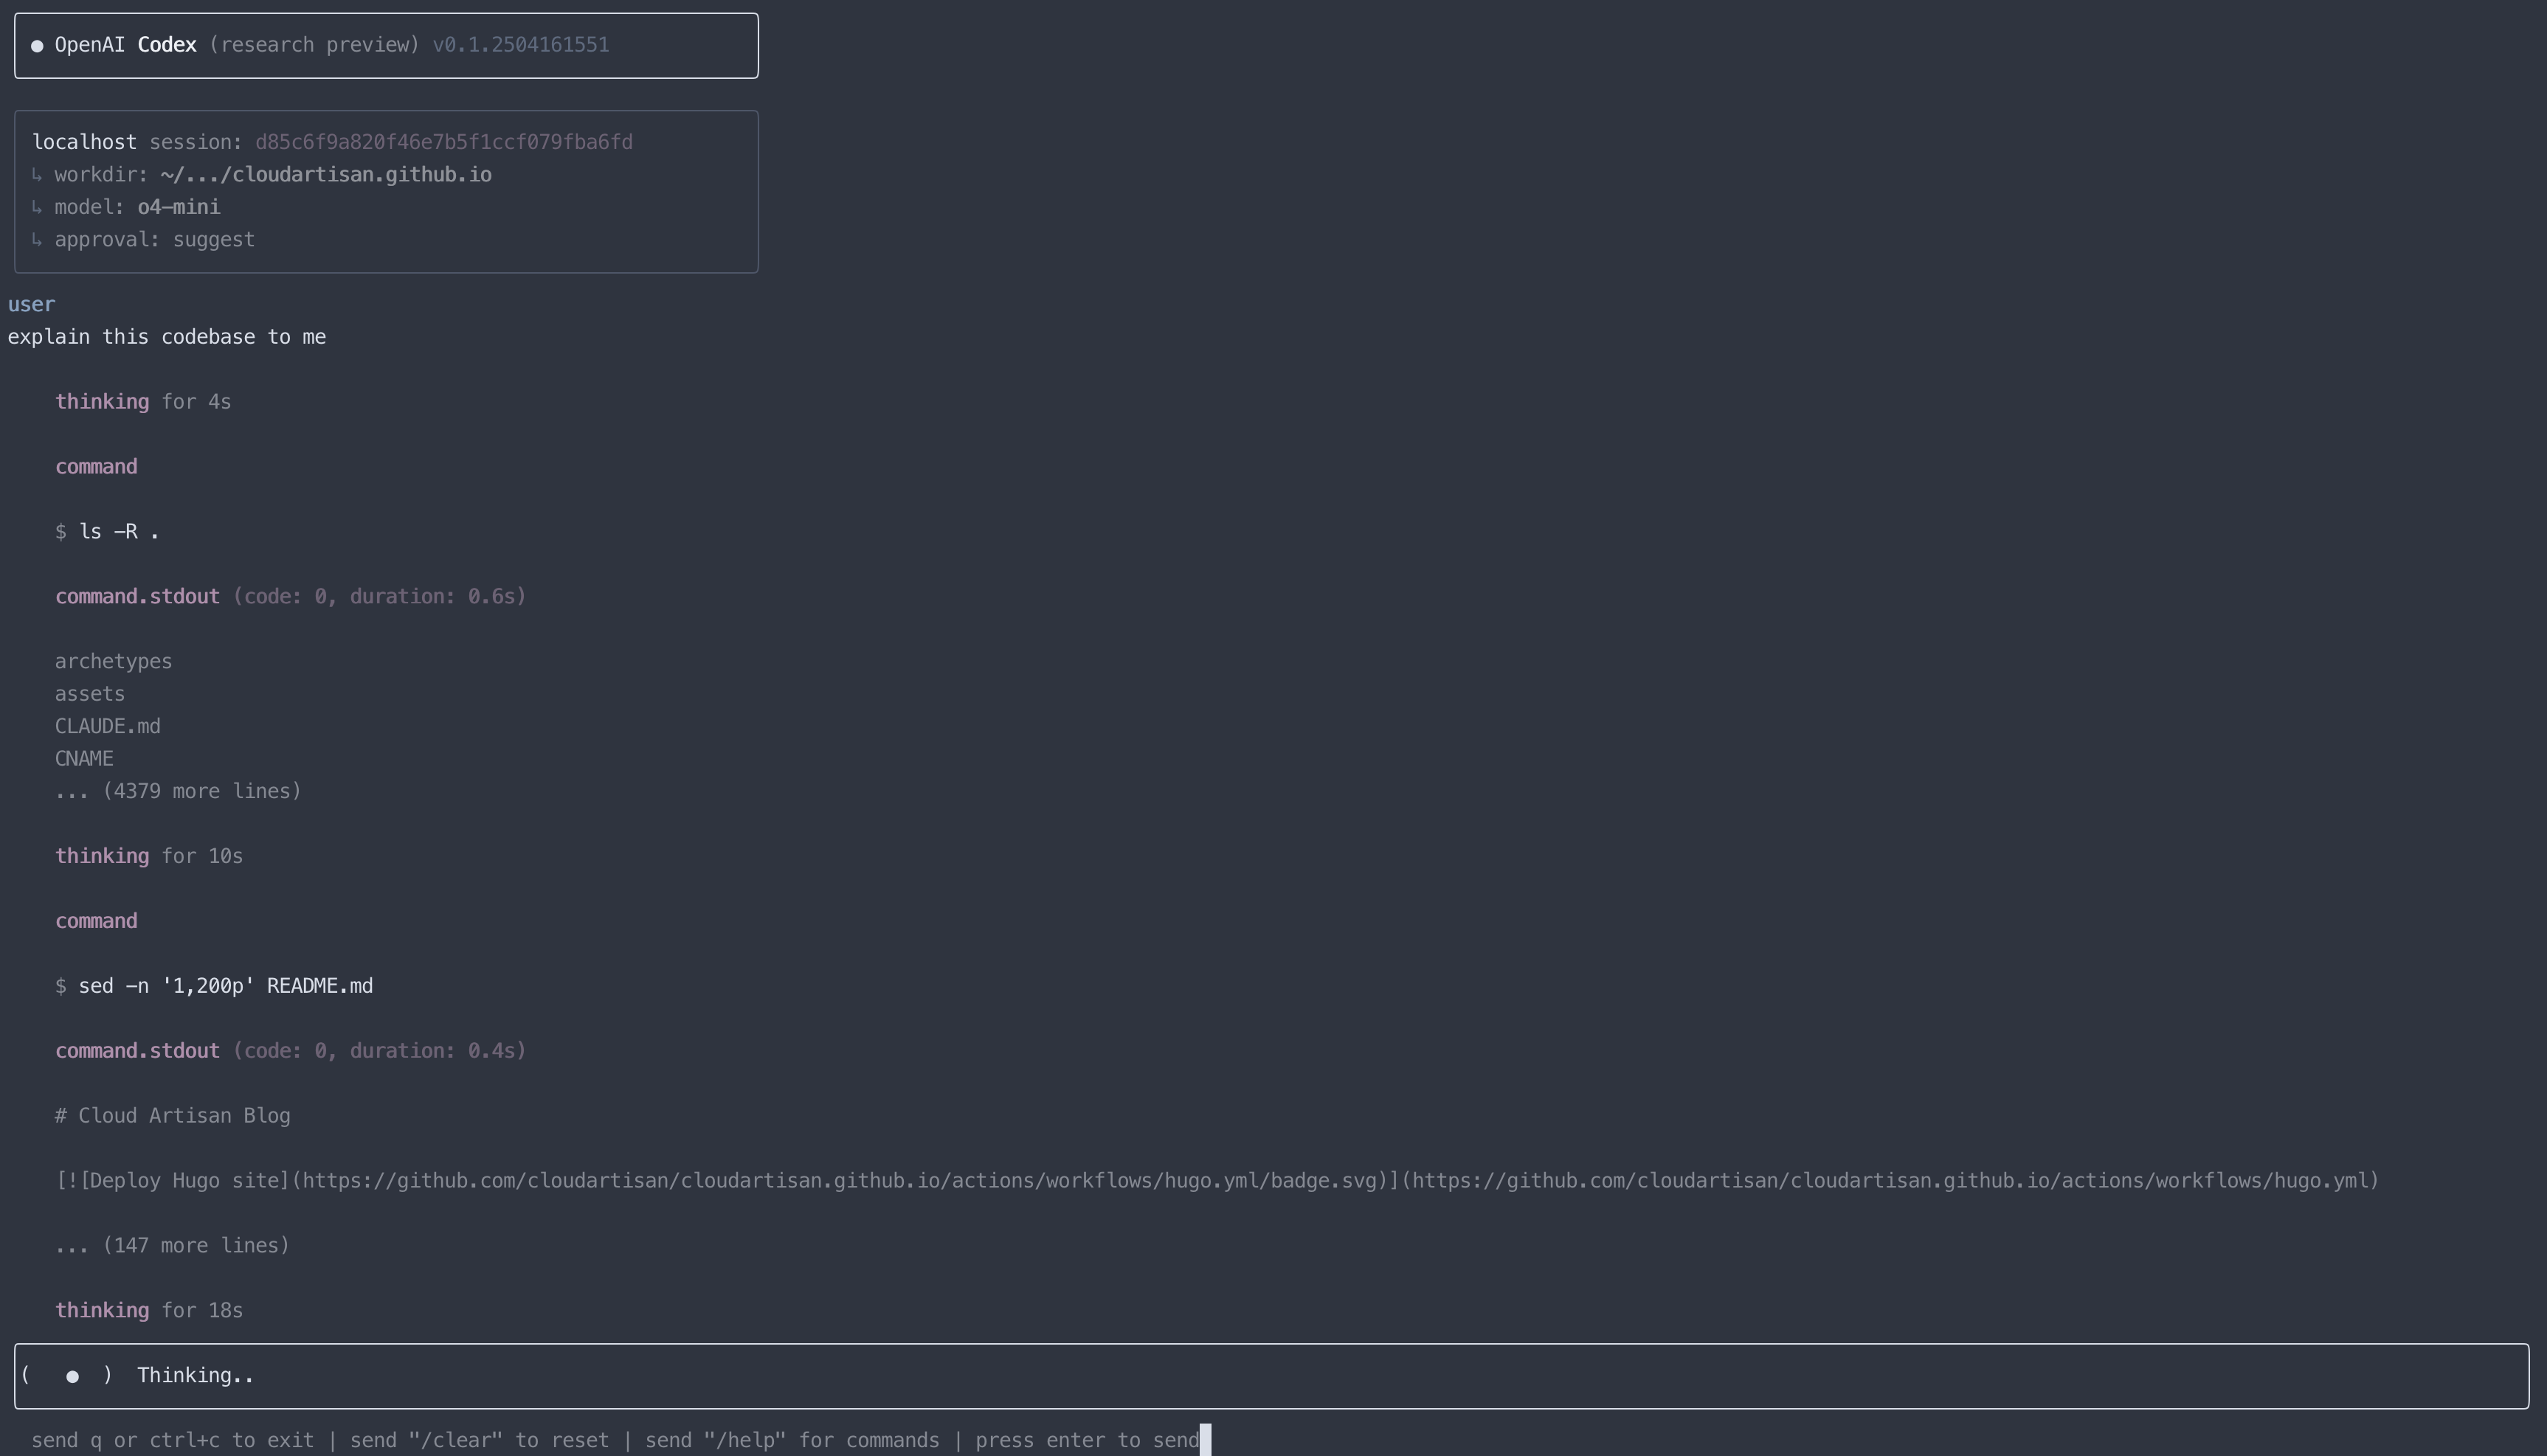
Single Command Mode #
For quick, one-off tasks such as explaining an unfamiliar codebase:
$ codex "explain the structure of this project"
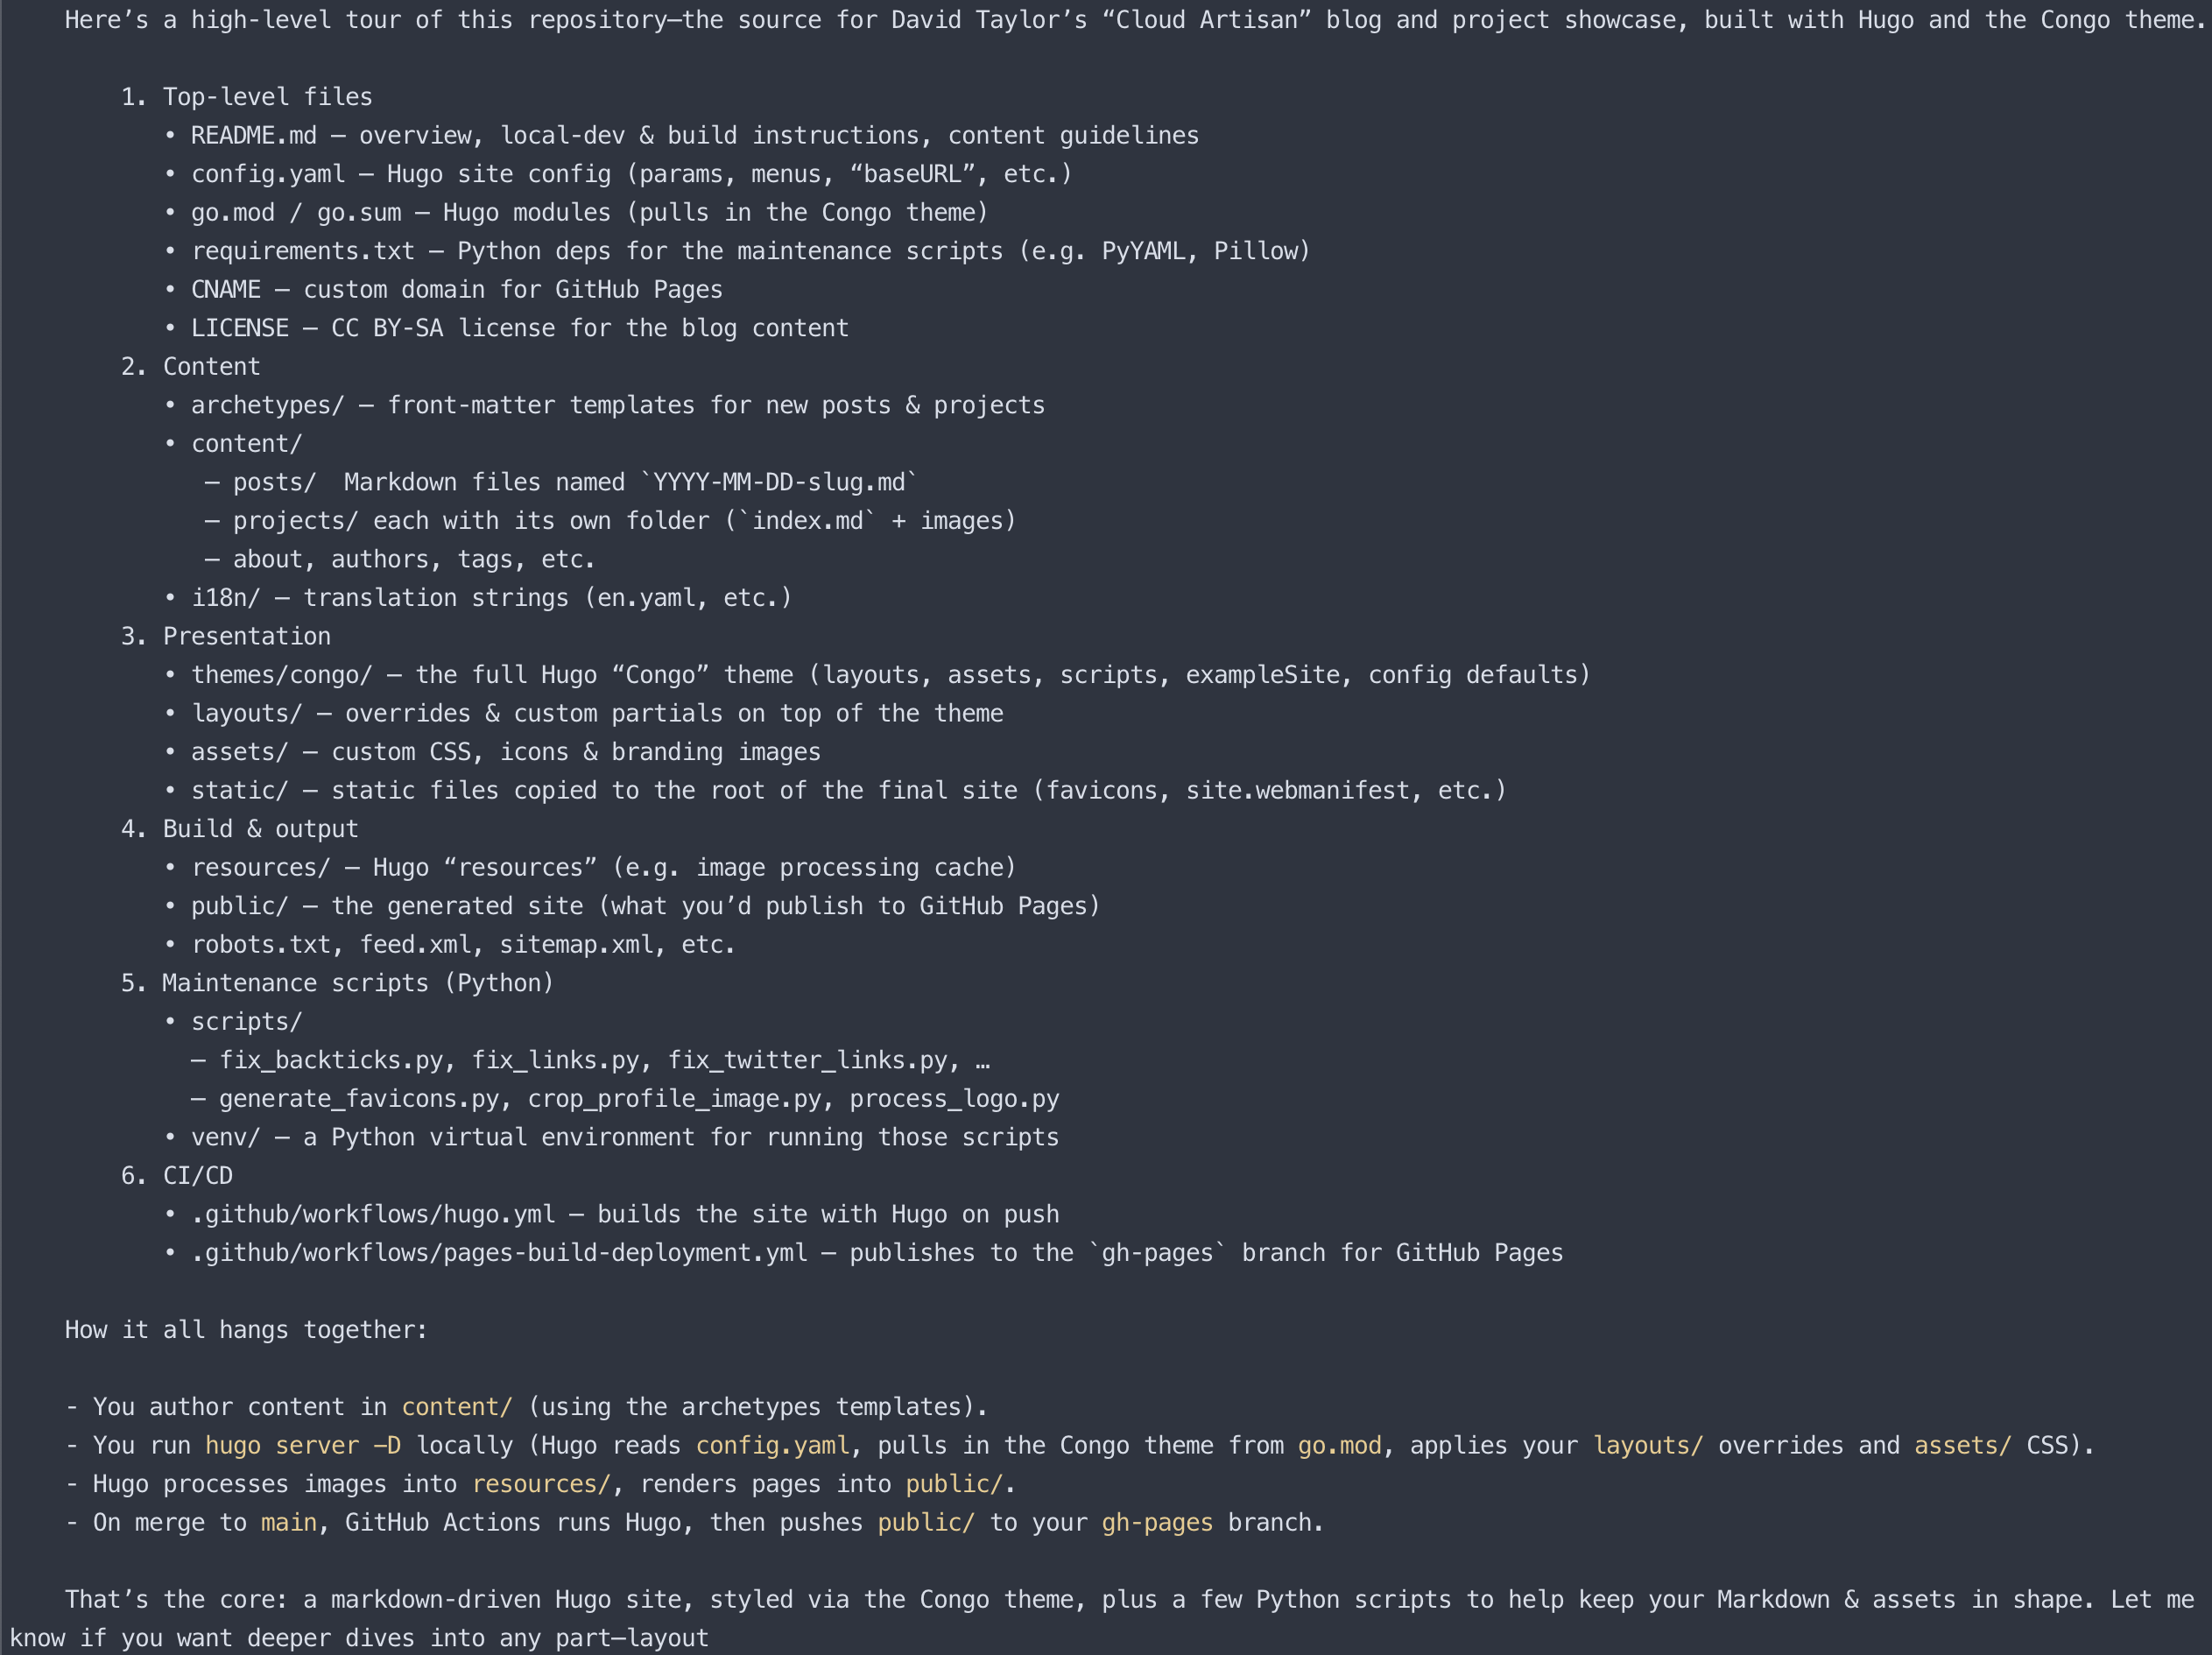
Codex quickly analyses the files and gives you a high-level overview of the architecture, main components, and how they fit together. It’s saved me hours of reading documentation when I need to quickly understand a new project.
Autonomous Mode #
The most interesting feature is the ability to let Codex work autonomously:
$ codex --approval-mode full-auto "create a REST API with Express"
With full-auto mode, Codex can execute shell commands and write files without asking for confirmation. It’s powerful but use it carefully - I typically only use this in clean test directories.
Permission Levels #
Codex has three permission modes that control what it can do:
- Suggest (default): Shows you changes but requires your approval for file edits and shell commands
- Auto Edit: Can automatically apply code changes but still requires approval for shell commands
- Full Auto: Has permission to execute commands and modify files autonomously, but runs in a network-disabled sandbox for safety
You can specify these modes when launching Codex:
# Auto-edit mode
$ codex --approval-mode auto-edit "refactor this class"
# or with the short flag
$ codex -a auto-edit "refactor this class"

# Full auto mode
$ codex --approval-mode full-auto "create a React component"
Use Cases #
Quiet Mode for CI/CD Pipelines #
One feature I’ve found particularly useful is the quiet mode, which is perfect for automation:
$ codex -q "update README with new installation instructions"
The -q (or --quiet) flag disables the interactive UI and outputs each reasoning step as JSON to stdout, making it parsable by other tools. This is ideal for CI/CD pipelines where you need structured output without human interaction.
You can also set this mode via an environment variable:
export CODEX_QUIET_MODE=1
For even more control over the output format, use the --json flag for consistent JSON formatting:
$ codex -q --json "explain utils.ts"
For practical automation in GitHub Actions or other CI systems, you could combine quiet mode with the auto-edit approval mode:
$ codex -q -a auto-edit "update CHANGELOG for next release"
The combination of quiet mode with auto-edit approval creates a powerful automation tool that can make intelligent code changes in non-interactive environments.
Multimodal Support #
Codex can process more than just text - it can also understand images and diagrams using the -i or --image flag:
$ codex -i screenshot.png "Explain what's happening in this UI"
This is incredibly useful when working with visual elements or debugging issues shown in screenshots.
Other Helpful Use Cases #
I’ve also found Codex particularly helpful for:
Refactoring Code #
When I need to update or modernise code, I can simply ask:
$ codex "Refactor this function to use async/await instead of callbacks"
Codex will analyse the code, suggest the changes, and with the right permission level, can apply them automatically.
Working with New Tech #
When I’m exploring a new framework or library, Codex can bootstrap examples:
$ codex "Show me how to set up a new simple Next.js application with TypeScript"
Documentation #
Generating documentation is usually tedious, but Codex makes it easier:
$ codex "Create documentation for this API endpoint"
Configuration and Customization #
Codex supports customization through configuration files. You can create a ~/.codex/config.yaml file to set default behaviour:
# Example ~/.codex/config.yaml
model: o4-mini  # Set your default model
approval_mode: auto-edit  # Set default approval mode
You can also create custom instructions for Codex in a ~/.codex/instructions.md file, similar to how CLAUDE.md works:
# My Coding Guidelines

## Style Preferences
- Use UK English spelling in comments and documentation
- Follow semantic versioning for all releases
- Always use TypeScript instead of plain JavaScript
- Prefer functional programming patterns over imperative ones

## Documentation Requirements
- Include JSDoc comments for all functions
- Add examples for complex functions
- Include type annotations for parameters and return values
- Update README when adding new features

## Testing Approach
- Write tests for all new functionality
- Use Jest for unit testing
- Aim for at least 80% code coverage
These instructions will be included in context when you run Codex, helping it adhere to your specific coding standards and preferences.
Codex vs Claude Code #
Codex emphasises code execution with its three-tiered permission model, while Claude Code takes a more cautious approach to running commands. Both are terminal-based. They may have different strengths, but I think this comes down to the model more than anything else.
I think the biggest differentiating factor, other than the model, is likely going to be the price. Claude Code can get expensive very quickly, especially with larger codebases. Codex uses your OpenAI API credits, which means it follows OpenAI’s standard token-based pricing.
While I haven’t done an exhaustive cost comparison, anecdotally I’ve found that for similar tasks:
- Codex tends to be more economical for shorter sessions and smaller projects
- Both tools can become costly with extensive use on large codebases
The sandbox model Codex uses (especially in full-auto mode) is a nice security touch, limiting network access when executing commands to reduce potential risks.
At the moment, if you’re not too focused on cost, I recommend simply trying both and seeing which works best for your common use-cases.
Limitations and Considerations #
It’s worth noting a few important limitations of Codex CLI:
Experimental Status: The README clearly states that Codex is “an experimental project under active development.” Features may change, and there could be unexpected behaviors.
Zero Data Retention: If your OpenAI organisation has Zero Data Retention (ZDR) enabled, you won’t be able to use Codex CLI as it requires the
store:trueparameter.Sandbox Limitations: While the network-disabled sandbox in full-auto mode increases security, it also means that network-dependent operations (like npm install) might not work as expected without your approval.
Conclusion #
OpenAI Codex CLI has become a part of my development workflow, especially for exploration and prototyping. The ability to have it execute commands autonomously (with proper caution) makes it useful for quickly setting up projects or navigating unfamiliar codebases.
There’s definitely a learning curve to using these tools effectively. You need to be precise with your prompts and understand the permission model to avoid unintended changes. But once you get comfortable with it, it’s like having a junior developer pairing with you - but one that never gets tired and will handle the routine tasks for you.
If you’re already using Claude Code, Codex doesn’t necessarily offer a compelling reason to switch. In my case, it was worth adding to my toolkit, as I already have an OpenAI account I’m paying for and so it was no great hurdle to set it up and add it to my development workflow.
Keep an eye out for my next post in this series, where I’ll dive into more advanced tips and tricks for getting the most out of Codex CLI.